When accessing internet from a home network environment, most likely you are behind NAT, or Network Address Translation. NAT is a technique used in computer networking to map private, local IP addresses to a public, globally unique IP address. It plays a crucial role in addressing the limited availability of public IP addresses. NAT also provides some level of protection over devices within a private network. By default, local devices are not directly reachable from the internet. Inbound traffic initiated from the internet is not automatically forwarded to devices within the private network.
With the existence of NAT, some extra efforts will be required to make internal home network services accessible to global internet. There are many different approaches to expose services behind NAT, and you can imagine all of them rely on some kind port forwarding. I roughly classify them into two major categories: (1) port forwarding at NAT router, and (2) using a public proxy server/service. In this post, I will go through these approaches and discuss their pros and cons.
Port Forwarding at NAT Router
Port forwarding at NAT router is the most straightforward approach to expose services. NAT router will be responsible to forward incoming traffic on a specific port to a designated internal IP address and port. This feature is supported by most home routers, and you can find the configuration from the management UI (usually under “Advanced Setup”).
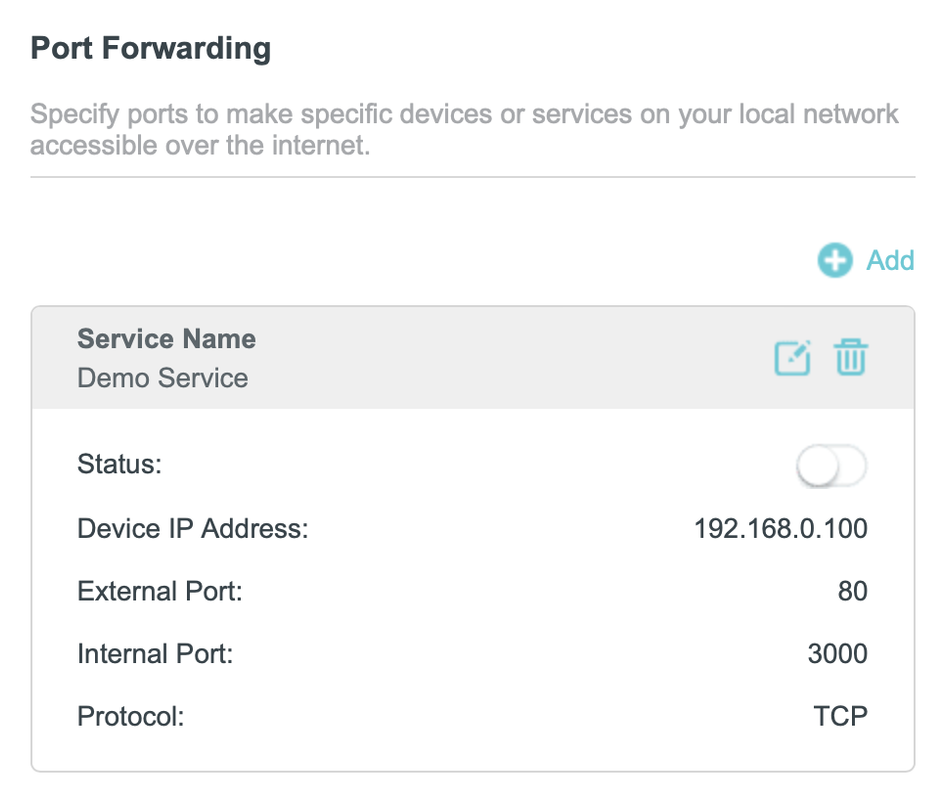
Port Forwarding Configuration from a TP-Link Router
However, there are two major disadvantages with port forwarding at NAT router:
- You will expose your home public IP address, unless you use DNS services that provides another layer of proxy (e.g. Cloudflare). From security point of view, this is NOT a recommended approach.
- In many situations, you don’t have control of the NAT configurations. E.g., in many places outside US, not every home has a global IP address. In these cases, port forwarding at NAT router simply is not an option.
Port Forwarding with a Public Proxy Server/Service
The second category of methods involves using a server with a public IP address (called proxy server here). A reverse channel is established between a port of local server to a port of the proxy server. Using this approach, the home IP address is not required when accessing the service, only the public IP address of the proxy server is used. Here I will cover how to get a proxy server and different ways to establish the channel between local server and proxy server.
Reverse Proxy Server
For the proxy server, you should easily get cheap one from a VPS/cloud provider. E.g., GCP (Google Cloud Platform) free tier offers one e2-micro virtual machine instance per month. But note if you have large amount of network traffic, be careful with the additional charges generated on networking usage.
Typically, a single public proxy server is shared by multiple local services. I personally prefer Nginx to do the reverse proxy based on domain names.
server {
    listen       80;
    server_name  app1.your-domain.com;

    location / {
        proxy_pass http://127.0.0.1:4001;
        proxy_set_header Host $http_host;
        proxy_set_header X-Forwarded-For $proxy_add_x_forwarded_for;
    }
}

server {
    listen       80;
    server_name  app2.your-domain.com;

    location / {
        proxy_pass http://127.0.0.1:4002;
        proxy_set_header Host $http_host;
        proxy_set_header X-Forwarded-For $proxy_add_x_forwarded_for;
    }
}
Here 4001, 4002 is the ports on proxy server that channeled with different local services.
To enable HTTPS, Let’s Encrypt is a Certificate Authority (CA) that provides an easy way to obtain and install free TLS/SSL certificates. On Ubuntu based servers, this can simply be done with following commands:
sudo apt install certbot python3-certbot-nginx
sudo certbot --nginx -d app1.your-domain.com -d app2.your-domain.com
The above commands will modify Nginx configs automatically to enable HTTPS on port 443. You can find more details about how to secure Nginx with Let’s Encrypt from this tutorial.
SSH Tunneling
SSH tunneling is the easiest way to establish a secure channel between local server and proxy server without any additional software. To get started, launch the following command to create a reverse SSH port forwarding:
ssh -R <remote_port>:localhost:<local_port> user@remote_server
However, I typically only use SSH tunneling for testing purposes due to the following concerns:
- Performance: SSH comes with some performance overhead from encryption and decryption. Most likely, the public proxy server is not a powerful node.
- I am not familiar with running SSH tunnel as a service. But this article might be helpful if you decide to go with this approach: Setup a secure (SSH) tunnel as a systemd service
frp (Fast Reverse Proxy)
frp is a software dedicated for tunneling between local server and public proxy server. From my limited experience it’s fast and solid. Here I will give a simple example to illustrate the usage of frp.
frp needs to be deployed on both public proxy server and local server. The latest version (as of 2024/1/21) of frp recommends using TOML as its config file.
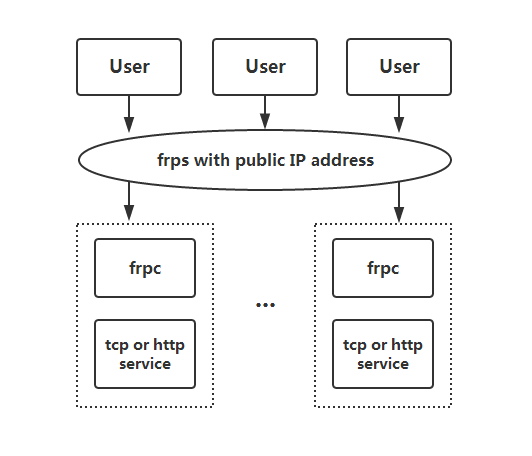
Architecture of frp: frps is deployed on public proxy server, and frpc is deployed on local service provider
frps is deployed on public proxy server. A typical frps.toml looks like the following:
bindPort = 7000
auth.method = "token"
auth.token = "12345678"
Port 7000 is used by frp and needs to be open from proxy server firewall. To launch frps: simply run ./frps -c ./frps.toml. A systemd service can be created to manage frps process more conveniently.
[Unit]
Description = frp server
After = network.target syslog.target
Wants = network.target

[Service]
Type = simple
ExecStart = /path/to/frps -c /path/to/frps.toml

[Install]
WantedBy = multi-user.target
frpc is deployed on local server (hosting the service). A typical frpc.toml looks like the following:
serverAddr = "x.x.x.x"
serverPort = 7000
auth.method = "token"
auth.token = "12345678"

[[proxies]]
name = "tcp-app-1"
type = "tcp"
localIP = "127.0.0.1"
localPort = 3000
remotePort = 4001
To launch frpc: simply run ./frpc -c ./frpc.toml
Now the service should be available on public server at port 4001. To access that, you need to either open the port 4001 from firewall or use Nginx reverse proxy as mentioned above.
frp supports many different protocols from lower level tcp/udp to application layer http/https. It also packs many advanced features like load balancing. Explore more about frp on its Github repo.
Cloudflare Tunnel
Cloudflare Tunnel is an alternative way to tunnel your service without the requirement of a proxy server. Basically the proxy part is handled by Cloudflare. I personally haven’t explored this approach much, but from this video by Christian Lempa, you might want to consider the following before moving forward:
- Cloudflare will have access to the content of your http traffic.
- Since the tunnel is on http level, it might have challenges with non-web apps. Actually, there might even be potential issues with non-html applications.
Closing Thoughts
Reverse proxy behind NAT is an essential part in self hosting. While it’s fun and exciting when you expose your service to broader internet for the first time, bear in mind you are also exposed to all the dangers on the internet now. Always learn more knowledge about networking and security if possible. Make sure appropriate network isolation is configured.
References
- Wikipedia: Network address translation
- Setup a secure (SSH) tunnel as a
systemdservice - How To Secure Nginx with Let’s Encrypt on Ubuntu 20.04
frpDocumentation- Youtube: Cloudflare Tunneling Intro by NetworkChuck
- Youtube: Cloudflare Tunneling Intro by Christian Lempa
- Youtube: Some Discussions on Cloudflare Tunneling by Christian Lempa
License
 This work is licensed
under a Creative Commons Attribution 4.0
International License.
This work is licensed
under a Creative Commons Attribution 4.0
International License.