Wake-on-LAN (WoL) is a technology that allows you to wake up a sleeping or powered-off PC over a network. Using WoL allows user put power hungry hardwares into sleep modes and activate them only when needed. This short post is a quick log of how I setup WoL for my workstation PC.
Motherboard BIOS Setup
My workstation uses an Asus ROG motherboard. To enable WoL, first enter BIOS interface by pressing delete during startup. Then goto [Advanced Mode] -> [Advanced] -> [APM Configuration], enable [Power On By PCI-E]. For more info please check Asus support page.
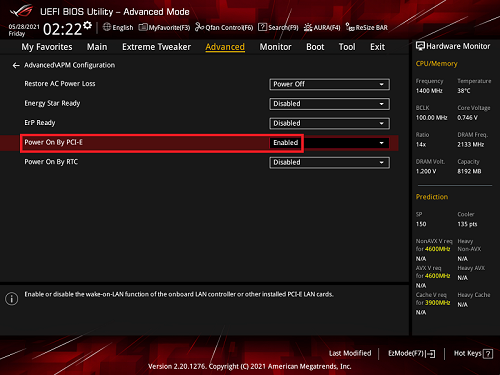
BIOS Setup to Enable WoL. Figure from Asus support page
Linux Setup
On workstation PC, first install ethtool to query and modify the WoL settings.
sudo apt install ethtool
To query WoL setting, use command:
ethtool <interface> | grep Wake-on
The output looks like the following:
Supports Wake-on: pumbag
Wake-on: g
The value g is required for WoL to work. If the value shows d (disabled) , you will need to enable WoL with the commands below. This tutorial also lists how to make the setting persistent.
ethtool -s <interface> wol g
The workstation PC is now ready. But before you turn off the workstation, don’t forget to take a note of the interface Mac address, which will be needed when you try to wake up.
On a machine within the same LAN, simply enter the following command to send Magic Packets and wake up the desired workstation PC.
wakeonlan -i <IP address of PC> <Mac address of PC>
References
License
 This work is licensed
under a Creative Commons Attribution 4.0
International License.
This work is licensed
under a Creative Commons Attribution 4.0
International License.